Posted on Leave a comment

Interfacing Arduino with MATLAB

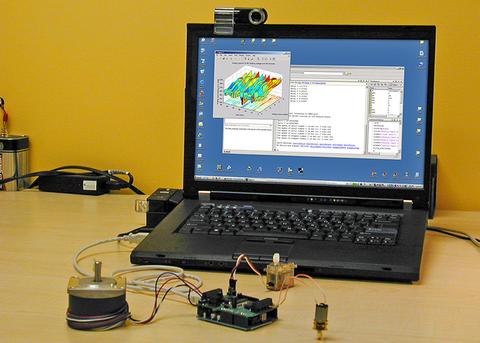
MATLAB is a very popular tool often used by engineers for technical computing, data visualization, simulation and algorithm development. What many people don’t know is that it is possible to connect an Arduino compatible board to MATLAB. This can be achieved through the MATLAB Support Package for Arduino which allows MATLAB to communicate to the Arduino through the USB cable. Not only does this give you to power to blink LEDs from MATLAB, but you can also configure your Arduino to easily collect data and send it into the MATLAB environment where it can be processed using the full power of your PC. Using the MATLAB environment it is also possible to create graphical interfaces to control hardware attached to your Arduino board, and much more! If you want to learn more about how this can be done there are many tutorials available including this one from from All About Circuits or this video series from Mathworks (the creators of MATLAB).

MATLAB

Want to keep in the loop about the latest in home automation? Subscribing to SuperHouse Automation on YouTube is the best place to start!

Inspired to start work on this project? Are you working on a project you would like us to feature in this blog? The team at SuperHouse Automation would love to know! Tell us about it in the comments section below or on Facebook and Twitter.

Posted on Leave a comment

Writing an Arduino Library

Have you ever written some code that you thought would make a great library but didn’t know where to get started? This tutorial will be perfect for you!

If you haven’t used libraries before they provide a really simple way to extend the functionality of the Arduino environment. For example there are libraries that make it very easy to connect to Ethernet, control servo motors or even work with LCD displays.

Writing a library

So how do you create your own library? First you will need to create two files, one header file (.h), which lists everything that is inside the library, and the source file (.cpp) which contains the actual code. After this you will need to take your existing sketch and appropriately fill out the header and source files. Fortunately this is quite a simple process and there is a great example available on the Arduino website.

Want to keep in the loop about the latest in home automation? Subscribing to SuperHouse Automation on YouTube is the best place to start!

Inspired to start work on this project? Are you working on a project you would like us to feature in this blog? The team at SuperHouse Automation would love to know! Tell us about it in the comments section below or on Facebook and Twitter.

Posted on Leave a comment

Arduino Interrupts

Interrupts are a fantastic tool to help increase the efficiency of your Arduino code and are typically very underutilized! So what exactly is an interrupt? In simple terms, interrupts are a mechanism found on Arduino (and many other microcontrollers) that simplify the process of reacting to real time events. This is achieved by constantly monitoring the status of a pin and immediately executing code, interrupting whatever was currently running, when the state of a pin changes (or on a rising or falling edge as desired). As you can imagine, this is significantly more efficient than having to wait for your code to reach the specific line where it checks the status of an input, and it frees up your Arduino to focus on other tasks rather than monitoring the state of a pin. To learn more about interrupts and how you can use them in your projects check out the video below from Core Electronics.

Want to keep in the loop about the latest in home automation? Subscribing to SuperHouse Automation on YouTube is the best place to start!

Inspired to start work on this project? Are you working on a project you would like us to feature in this blog? The team at SuperHouse Automation would love to know! Tell us about it in the comments section below or on Facebook and Twitter.

Posted on Leave a comment

Hockey Sin Bin Management System

At SuperHouse Automation we love it when our fans share their own projects with us. Ben Lennard from Lennard Electronics recently got in touch and shared his great project. Using four Freetronics dot matrix displays, Ben has built a sin bin management display for the National Hockey Stadium in Wellington. Whilst the system is used to display the time and various advertisements, the primary use is to keep track of how long different players have been in the sin bin.

The displays

Ben’s project uses four DMD’s which are chained together and controlled by an Arduino Uno. The Uno receives commands from a Raspberry Pi powered touchscreen controller box, via a Bluetooth link. The outdoor display is housed in a custom built fiber glass case, which has special vents built into it to allow air to flow in and out whilst still keeping dust and water out. Thanks Ben for sharing!

The touch screen controller

The Hockey Statium

Want to keep in the loop about the latest in home automation? Subscribing to SuperHouse Automation on YouTube is the best place to start!

Inspired to start work on this project? Are you working on a project you would like us to feature in this blog? The team at SuperHouse Automation would love to know! Tell us about it in the comments section below or on Facebook and Twitter.

Posted on Leave a comment

DIY Soldering Station

Most hobbyists start off with a cheap and nasty soldering iron which takes minutes to heat up, and provides no temperature control. Whilst a decent soldering station is a significant upgrade from a typical beginners iron, the cost can be prohibitive. Thankfully, GreatScottLab has put together a great instructable detailing how you can build your own fully controllable soldering station.

The parts required to build a DIY soldering station.

Not only is building your own significantly cheaper than buying a soldering station, but the process of building the electronics and 3D printing the enclosure provides a fantastic educational opportunity! To find out more about how you can get started building your own soldering station checkout the following link.

Want to keep in the loop about the latest in home automation? Subscribing to SuperHouse Automation on YouTube is the best place to start!

Inspired to start work on this project? Are you working on a project you would like us to feature in this blog? The team at SuperHouse Automation would love to know! Tell us about it in the comments section below or on Facebook and Twitter.

Posted on Leave a comment

I2C For Arduino

The I2C or “I squared C” bus is a simple way to transfer data between different integrated circuits, boards or sensors in your Arduino project. I2C stands for “Inter-Integrated Circuit”. One of the great things about I2C is that it only requires two connections to your Arduino, SDA (data) and SCL (clock), and you can easily connect multiple devices to the bus. If you want to learn more about the I2C bus checkout this tutorial from tronixstuff, or this tutorial from How To Mechatronics.

I2C

Want to keep in the loop about the latest in home automation? Subscribing to SuperHouse Automation on YouTube is the best place to start!

Inspired to start work on this project? Are you working on a project you would like us to feature in this blog? The team at SuperHouse Automation would love to know! Tell us about it in the comments section below or on Facebook and Twitter.

Posted on Leave a comment

Using a Camera Sensor with Arduino

It is easy to imagine that incorporating a camera into an Arduino project would be far too advanced for the average hobbyist! However, with the advent of many low cost and easy to use camera sensor modules such as the OV7670, the barrier of entry has been significantly lowered. Mybotic has put together a great instructable explaining how you can wire up the OC7670 camera to your Arduino, and set it up to take photos which are loaded straight onto your computer using the Arduino serial port. To find out more check out the following link.

Arduino Camera Sensor

Want to keep in the loop about the latest in home automation? Subscribing to SuperHouse Automation on YouTube is the best place to start!

Inspired to start work on this project? Are you working on a project you would like us to feature in this blog? The team at SuperHouse Automation would love to know! Tell us about it in the comments section below or on Facebook and Twitter.

Posted on Leave a comment

Programming the ESP8266 from the Arduino IDE

The ESP8266 is an extremely popular, low cost WiFi module which is widely used in DIY hardware hacking community.

ESP8226

The module provides one of the easiest ways to add WiFi to an Arduino project and as a result of it’s popularity there is a plenty of help available online if you get stuck! Whilst the ESP8266 can be used in combination with an Arduino, you can also use it as a stand alone microcontroller. Fortunately programming the ESP8266 as a stand alone board is quite straightforward and is even possible through the existing Arduino IDE. To find out more about how you can do program your ESP8266, checkout the following tutorial.

PIN OUT

Want to keep in the loop about the latest in home automation? Subscribing to SuperHouse Automation on YouTube is the best place to start!

Inspired to start work on this project? Are you working on a project you would like us to feature in this blog? The team at SuperHouse Automation would love to know! Tell us about it in the comments section below or on Facebook and Twitter.

Posted on Leave a comment

Fixing a Blown Arduino

Although Arduino boards are typically quite robust, things can still go wrong, especially when used by total beginners. One of the most catastrophic problems that can occur is totally burning out the ATmega microcontroller which is the brains of most Arduino boards. Fortunately this scenario doesn’t have to mean the end for your Arduino board and can actually represent a fantastic learning opportunity! With this tutorial from make you can learn how to replace a burnt-out ATmega in your Arduino board and upload the bootloader using an AVR ISP programmer, so that the new ATmega functions just like an Arduino. This sure beats purchasing an entirely new board!

Blown ATmegas can be replaced!

If you are looking for an ICSP AVR programmer look no further than the Freetronics USBasp! The programmer has a USB interface and allows you to program bootloaders or firmware on a wide range of microcontrollers including the ATmega which is used in Arduino boards. To find out more and to order checkout the following link.

Want to keep in the loop about the latest in home automation? Subscribing to SuperHouse Automation on YouTube is the best place to start!

Inspired to start work on this project? Are you working on a project you would like us to feature in this blog? The team at SuperHouse Automation would love to know! Tell us about it in the comments section below or on Facebook and Twitter.

Posted on Leave a comment

Arduino Word Generator

Whilst ATmega microprocessors are fantastic for use in Arduino boards they can also be used on their own, which can simplify projects a lot! One great example of this is a word generator created by duino4projects. The project uses an ATmega168 to generate the words and prints them on a 4 digit-16 segment display. To find out more about this project check out the following link.

Arduino Word Generator

If you are looking for an standalone ATmega microcontroller checkout the Freetronics ATmega328P which is the same chip used in our Eleven and EtherTen. The ATmega328P is perfect for building your only Arduino compatible project directly on a breadboard or custom PCB. For more information and to order checkout the following link.

ATmega

Want to keep in the loop about the latest in home automation? Subscribing to SuperHouse Automation on YouTube is the best place to start!

Inspired to start work on this project? Are you working on a project you would like us to feature in this blog? The team at SuperHouse Automation would love to know! Tell us about it in the comments section below or on Facebook and Twitter.