Posted on Leave a comment

Interfacing Arduino with MATLAB

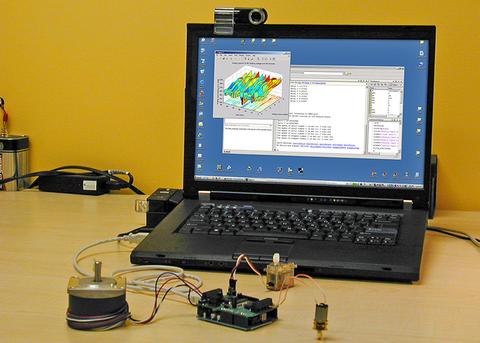
MATLAB is a very popular tool often used by engineers for technical computing, data visualization, simulation and algorithm development. What many people don’t know is that it is possible to connect an Arduino compatible board to MATLAB. This can be achieved through the MATLAB Support Package for Arduino which allows MATLAB to communicate to the Arduino through the USB cable. Not only does this give you to power to blink LEDs from MATLAB, but you can also configure your Arduino to easily collect data and send it into the MATLAB environment where it can be processed using the full power of your PC. Using the MATLAB environment it is also possible to create graphical interfaces to control hardware attached to your Arduino board, and much more! If you want to learn more about how this can be done there are many tutorials available including this one from from All About Circuits or this video series from Mathworks (the creators of MATLAB).

MATLAB

Want to keep in the loop about the latest in home automation? Subscribing to SuperHouse Automation on YouTube is the best place to start!

Inspired to start work on this project? Are you working on a project you would like us to feature in this blog? The team at SuperHouse Automation would love to know! Tell us about it in the comments section below or on Facebook and Twitter.

Posted on Leave a comment

Writing an Arduino Library

Have you ever written some code that you thought would make a great library but didn’t know where to get started? This tutorial will be perfect for you!

If you haven’t used libraries before they provide a really simple way to extend the functionality of the Arduino environment. For example there are libraries that make it very easy to connect to Ethernet, control servo motors or even work with LCD displays.

Writing a library

So how do you create your own library? First you will need to create two files, one header file (.h), which lists everything that is inside the library, and the source file (.cpp) which contains the actual code. After this you will need to take your existing sketch and appropriately fill out the header and source files. Fortunately this is quite a simple process and there is a great example available on the Arduino website.

Want to keep in the loop about the latest in home automation? Subscribing to SuperHouse Automation on YouTube is the best place to start!

Inspired to start work on this project? Are you working on a project you would like us to feature in this blog? The team at SuperHouse Automation would love to know! Tell us about it in the comments section below or on Facebook and Twitter.


Posted on Leave a comment

Arduino Interrupts

Interrupts are a fantastic tool to help increase the efficiency of your Arduino code and are typically very underutilized! So what exactly is an interrupt? In simple terms, interrupts are a mechanism found on Arduino (and many other microcontrollers) that simplify the process of reacting to real time events. This is achieved by constantly monitoring the status of a pin and immediately executing code, interrupting whatever was currently running, when the state of a pin changes (or on a rising or falling edge as desired). As you can imagine, this is significantly more efficient than having to wait for your code to reach the specific line where it checks the status of an input, and it frees up your Arduino to focus on other tasks rather than monitoring the state of a pin. To learn more about interrupts and how you can use them in your projects check out the video below from Core Electronics.

Want to keep in the loop about the latest in home automation? Subscribing to SuperHouse Automation on YouTube is the best place to start!

Inspired to start work on this project? Are you working on a project you would like us to feature in this blog? The team at SuperHouse Automation would love to know! Tell us about it in the comments section below or on Facebook and Twitter.

Posted on Leave a comment

DIY Soldering Station

Most hobbyists start off with a cheap and nasty soldering iron which takes minutes to heat up, and provides no temperature control. Whilst a decent soldering station is a significant upgrade from a typical beginners iron, the cost can be prohibitive. Thankfully, GreatScottLab has put together a great instructable detailing how you can build your own fully controllable soldering station.

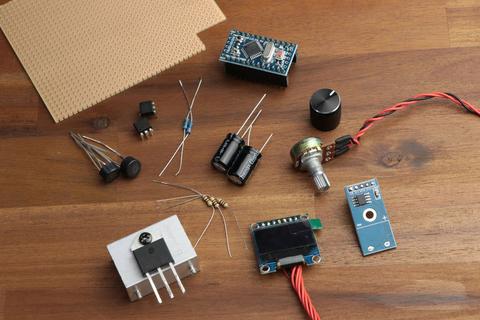
The parts required to build a DIY soldering station.

Not only is building your own significantly cheaper than buying a soldering station, but the process of building the electronics and 3D printing the enclosure provides a fantastic educational opportunity! To find out more about how you can get started building your own soldering station checkout the following link.

Want to keep in the loop about the latest in home automation? Subscribing to SuperHouse Automation on YouTube is the best place to start!

Inspired to start work on this project? Are you working on a project you would like us to feature in this blog? The team at SuperHouse Automation would love to know! Tell us about it in the comments section below or on Facebook and Twitter.

Posted on Leave a comment

I2C For Arduino

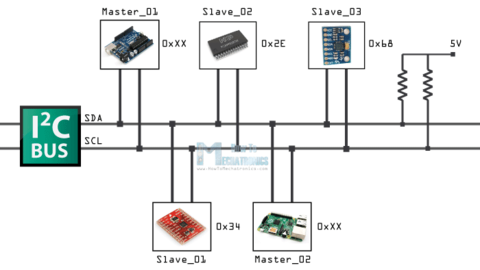
The I2C or “I squared C” bus is a simple way to transfer data between different integrated circuits, boards or sensors in your Arduino project. I2C stands for “Inter-Integrated Circuit”. One of the great things about I2C is that it only requires two connections to your Arduino, SDA (data) and SCL (clock), and you can easily connect multiple devices to the bus. If you want to learn more about the I2C bus checkout this tutorial from tronixstuff, or this tutorial from How To Mechatronics.

I2C

Want to keep in the loop about the latest in home automation? Subscribing to SuperHouse Automation on YouTube is the best place to start!

Inspired to start work on this project? Are you working on a project you would like us to feature in this blog? The team at SuperHouse Automation would love to know! Tell us about it in the comments section below or on Facebook and Twitter.
Posted on Leave a comment

Arduino Easter Egg Decorator

Happy Easter from the team at SuperHouse Automation! Decorating eggs is a great Easter tradition.  Curtis Swartley has built a great random easter egg decorator. The project uses servos and a stepper motor controlled by a number of Arduino boards which control the spin of the egg and the position of the drawing pen. If you want to make your own decorator or see it in action checkout the following link.

Want to keep in the loop about the latest in home automation? Subscribing to SuperHouse Automation on YouTube is the best place to start!

Inspired to start work on this project? Are you working on a project you would like us to feature in this blog? The team at SuperHouse Automation would love to know! Tell us about it in the comments section below or on Facebook and Twitter.

Posted on Leave a comment

What is EEPROM?

In this blog post we will be exploring EEPROM, an unheralded but extremely useful feature of Arduino boards. EEPROM stands for Electrically Erasable Programmable Read-Only Memory and is a form of memory that can remember things even when the power is turned off or the Arduino is reset. If you take a look at the specifications for most Arduino compatible boards you will see an entry for EEPROM, for example, the Freetronics EtherMega shown below has 4KB of EEPROM.

EEPROM

The main benefit of this kind of memory is that it can be used to store data generated in a sketch on a more permanent basis. Typically EEPROM is used to store configuration parameters or serial numbers, although it can also be useful for storing regularly updating information such as the number of times the Arduino has been reset or cumulative measurements such as total distance travelled. To learn more about how you can put the EEPROM in your Arduino to use, checkout this great tutorial from tronixstuff.

The Freetronics EtherMega is a greatfully-loaded” Arduino-compatible board. Apart from being completely Arduino Mega2560-compatible, it includes a full Ethernet interface, a microSD card socket, full USB interface, optional Power-over-Ethernet support and still has a circuit prototyping area with extra I2C interface pins. So if your project is breaking the limits, upgrade to the EtherMega today.

Want to keep in the loop about the latest in home automation? Subscribing to SuperHouse Automation on YouTube is the best place to start!

Inspired to start work on this project? Are you working on a project you would like us to feature in this blog? The team at SuperHouse Automation would love to know! Tell us about it in the comments section below or on Facebook and Twitter.
Posted on 1 Comment

Getting Started with Arduino

Getting started with Arduino and electronics can be a daunting but highly rewarding task. Fortunately there are an abundance of fantastic resources available online to help get you flashing LEDs and building your own projects.

Core Electronics has just released a free, comprehensive Arduino Workshop for Beginners which is a great tool to help get you started. The workshop is comprised of a video series which covers the everything from “what is Arduino” to specifics such as how you can use SPI, I2C, EEPROM or interrupts in your projects. You can view the first video in the series below:

Want to keep in the loop about the latest in home automation? Subscribing to SuperHouse Automation on YouTube is the best place to start!

Inspired to start work on this project? Are you working on a project you would like us to feature in this blog? The team at SuperHouse Automation would love to know! Tell us about it in the comments section below or on Facebook and Twitter.

Posted on 1 Comment

Awesome Motion Tracking Dart Board

Darts can be a great game, although if you aren’t very good it can be very frustrating! In an attempt to solve this “problem” former NASA engineer Rober has spent three years designing a building a motion tracking dart board which automatically moves as the dart is being thrown to ensure you hit the bulls eye with every shot. One of the critical elements of this system is an Arduino compatible board which helps to control the motors to realign the dart board! Although this creation is a little over engineered it is way too cool not to share!

Want to keep in the loop about the latest in home automation? Subscribing to SuperHouse Automation on YouTube is the best place to start!

Inspired to start work on this project? Are you working on a project you would like us to feature in this blog? The team at SuperHouse Automation would love to know! Tell us about it in the comments section below or on Facebook and Twitter.

Posted on Leave a comment

Using a Camera Sensor with Arduino

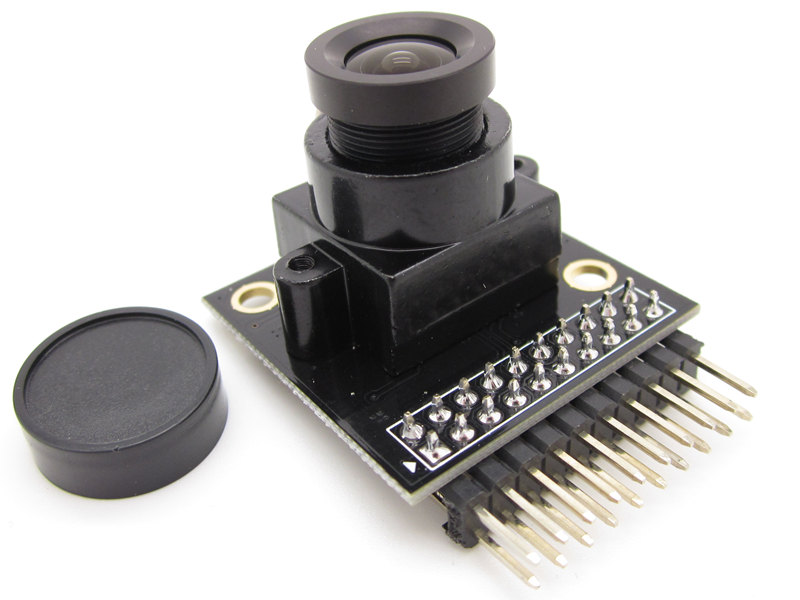
It is easy to imagine that incorporating a camera into an Arduino project would be far too advanced for the average hobbyist! However, with the advent of many low cost and easy to use camera sensor modules such as the OV7670, the barrier of entry has been significantly lowered. Mybotic has put together a great instructable explaining how you can wire up the OC7670 camera to your Arduino, and set it up to take photos which are loaded straight onto your computer using the Arduino serial port. To find out more check out the following link.

Arduino Camera Sensor

Want to keep in the loop about the latest in home automation? Subscribing to SuperHouse Automation on YouTube is the best place to start!

Inspired to start work on this project? Are you working on a project you would like us to feature in this blog? The team at SuperHouse Automation would love to know! Tell us about it in the comments section below or on Facebook and Twitter.