Posted on Leave a comment

Using a Camera Sensor with Arduino

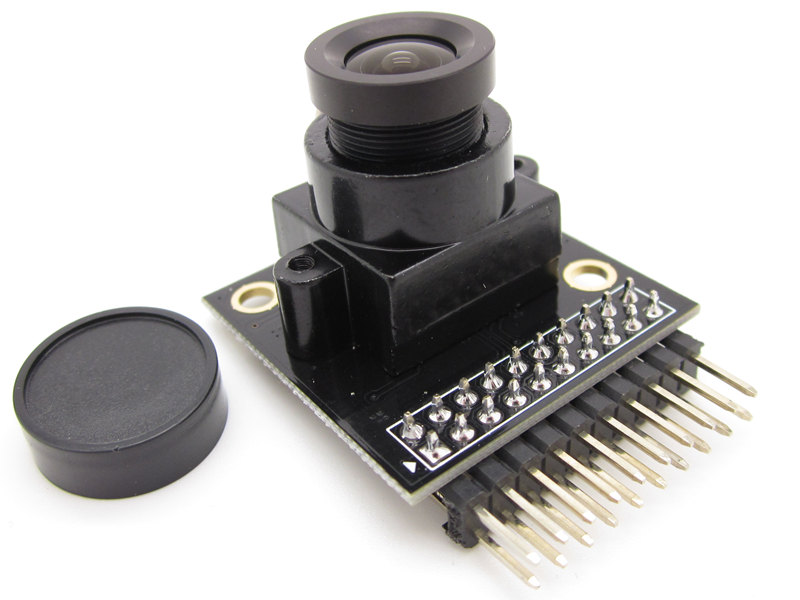
It is easy to imagine that incorporating a camera into an Arduino project would be far too advanced for the average hobbyist! However, with the advent of many low cost and easy to use camera sensor modules such as the OV7670, the barrier of entry has been significantly lowered. Mybotic has put together a great instructable explaining how you can wire up the OC7670 camera to your Arduino, and set it up to take photos which are loaded straight onto your computer using the Arduino serial port. To find out more check out the following link.

Arduino Camera Sensor

Want to keep in the loop about the latest in home automation? Subscribing to SuperHouse Automation on YouTube is the best place to start!

Inspired to start work on this project? Are you working on a project you would like us to feature in this blog? The team at SuperHouse Automation would love to know! Tell us about it in the comments section below or on Facebook and Twitter.

Posted on 7 Comments

#22: AXA Electric Window Motors Controlled By LIN Bus And Arduino

Electric window motors allow your home automation system to open and close your windows as required. This could be useful for opening windows to allow ventilation, or to make sure all windows are automatically closed and locked when you leave home.

I recently got my hands on some AXA electric window motors that include a LIN bus interface so they can be linked to a home automation system, but I’ve never used LIN before so I needed to learn a bit about how it works. I designed my own LIN interface module that allows me to connect my laptop to LIN devices and manually send messages, and the module also allows an Arduino to control the window motors.

Parts used

Source code

Simple example that provides a menu and sends commands to a single LIN interface: AXARemoteSerialLinbus

More complex example which includes MQTT, DHCP, reading a MAC address ROM, 4 LIN interfaces, a watchdog timer, and a temperature / humidity sensor: AXAWindowMQTT

Instructions and explanation

More details to follow! I’ll update this after the video is ready.

Posted on Leave a comment

Programming the ESP8266 from the Arduino IDE

The ESP8266 is an extremely popular, low cost WiFi module which is widely used in DIY hardware hacking community.

ESP8226

The module provides one of the easiest ways to add WiFi to an Arduino project and as a result of it’s popularity there is a plenty of help available online if you get stuck! Whilst the ESP8266 can be used in combination with an Arduino, you can also use it as a stand alone microcontroller. Fortunately programming the ESP8266 as a stand alone board is quite straightforward and is even possible through the existing Arduino IDE. To find out more about how you can do program your ESP8266, checkout the following tutorial.

PIN OUT

Want to keep in the loop about the latest in home automation? Subscribing to SuperHouse Automation on YouTube is the best place to start!

Inspired to start work on this project? Are you working on a project you would like us to feature in this blog? The team at SuperHouse Automation would love to know! Tell us about it in the comments section below or on Facebook and Twitter.

Posted on Leave a comment

Fixing a Blown Arduino

Although Arduino boards are typically quite robust, things can still go wrong, especially when used by total beginners. One of the most catastrophic problems that can occur is totally burning out the ATmega microcontroller which is the brains of most Arduino boards. Fortunately this scenario doesn’t have to mean the end for your Arduino board and can actually represent a fantastic learning opportunity! With this tutorial from make you can learn how to replace a burnt-out ATmega in your Arduino board and upload the bootloader using an AVR ISP programmer, so that the new ATmega functions just like an Arduino. This sure beats purchasing an entirely new board!

Blown ATmegas can be replaced!

If you are looking for an ICSP AVR programmer look no further than the Freetronics USBasp! The programmer has a USB interface and allows you to program bootloaders or firmware on a wide range of microcontrollers including the ATmega which is used in Arduino boards. To find out more and to order checkout the following link.

Want to keep in the loop about the latest in home automation? Subscribing to SuperHouse Automation on YouTube is the best place to start!

Inspired to start work on this project? Are you working on a project you would like us to feature in this blog? The team at SuperHouse Automation would love to know! Tell us about it in the comments section below or on Facebook and Twitter.

Posted on Leave a comment

Arduino Word Generator

Whilst ATmega microprocessors are fantastic for use in Arduino boards they can also be used on their own, which can simplify projects a lot! One great example of this is a word generator created by duino4projects. The project uses an ATmega168 to generate the words and prints them on a 4 digit-16 segment display. To find out more about this project check out the following link.

Arduino Word Generator

If you are looking for an standalone ATmega microcontroller checkout the Freetronics ATmega328P which is the same chip used in our Eleven and EtherTen. The ATmega328P is perfect for building your only Arduino compatible project directly on a breadboard or custom PCB. For more information and to order checkout the following link.

ATmega

Want to keep in the loop about the latest in home automation? Subscribing to SuperHouse Automation on YouTube is the best place to start!

Inspired to start work on this project? Are you working on a project you would like us to feature in this blog? The team at SuperHouse Automation would love to know! Tell us about it in the comments section below or on Facebook and Twitter.

Posted on Leave a comment

Sound Generation

Regardless of what type of electronics project you are working on you will likely have to provide feedback to your users about the status of the system. Typically this can be done visually using LEDs or small displays. However, another great way to provide user feedback can be through sound. This might be as simple as a quick “beep” to indicate that the fridge door has been left open, or as complex as providing background music for a game! Thankfully adding sound to your projects is actually quite easy! The best way to get started is to checkout the following guide.

Sound

Want to keep in the loop about the latest in home automation? Subscribing to SuperHouse Automation on YouTube is the best place to start!

Inspired to start work on this project? Are you working on a project you would like us to feature in this blog? The team at SuperHouse Automation would love to know! Tell us about it in the comments section below or on Facebook and Twitter.

Posted on Leave a comment

Motion Sensing Water Gun

During the warm Australian summer months there is nothing more refreshing than a water fight! James Cripps’s, motion sensor water gun you can make sure you always emerge from these fights victorious. The water gun uses a motion sensor and an Arduino to fire the gun anytime motion is detected. The instructions James provides are very thorough so you should have no problem getting started building your own water gun.

Water Fight

Want to keep in the loop about the latest in home automation? Subscribing to SuperHouse Automation on YouTube is the best place to start!

Inspired to start work on this project? Are you working on a project you would like us to feature in this blog? The team at SuperHouse Automation would love to know! Tell us about it in the comments section below or on Facebook and Twitter.

Posted on 2 Comments

SuperHouse Vlog #53: Help! The Internet killed my toaster!

A major outage at Amazon Web Services this morning left millions of people with broken home automation devices: door locks, heating, lights, ovens, even doorbells.

Don’t let your home automation system be dependent on external services!

I always keep two principles (or rules) in mind when building my own systems.

Rule #1: No external dependencies.

Rule #2: Mechanical overrides.