With this awesome project from thesystemis you can draw using only the movement of your eyes! Surprisingly this project can be made quite cheaply using the brainpower of an Arduino Uno which talks to the open source eye tracking software – “EyeWriter” running on a computer. If you want to find out more check out the following link.
Want to keep in the loop about the latest in home automation? Subscribing to SuperHouse Automation on YouTube is the best place to start!
Inspired to start work on this project? Are you working on a project you would like us to feature in this blog? The team at SuperHouse Automation would love to know! Tell us about it in the comments section below or on Facebook and Twitter.
Although typically electronics and water do not mix, “sneel” the robotic fish is certainly an exception. The robotic fish is designed to emulate the motion of a real water snake and is perfect for underwater exploration. A number of Arduino Uno controlled servo motors undulate the robot to propel it through the water.
The applications of such a underwater drone are endless including collecting data about water quality or exploring confined underwater areas such as pipelines! If you want to learn how you can make your own “sneel” checkout the following link.
Want to keep in the loop about the latest in home automation? Subscribing to SuperHouse Automation on YouTube is the best place to start!
Inspired to start work on this project? Are you working on a project you would like us to feature in this blog? The team at SuperHouse Automation would love to know! Tell us about it in the comments section below or on Facebook and Twitter.
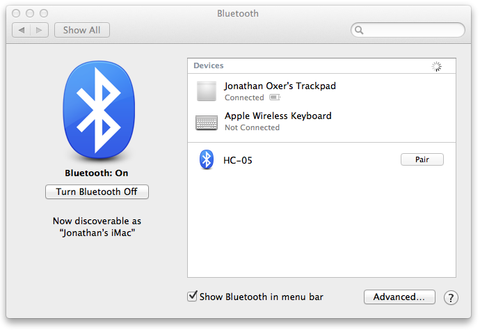
If you have been working on an Arduino project which requires Bluetooth then this tutorial is perfect for you. One of the challenges of working with Bluetooth can be working through the intricacies of pairing your Arduino project with the computer of phone you are wanting to communicate with. Fortunately the team at Freetronics have put together a great guide of how you can pair the Freetronics Bluetooth Shield or Module to Mac, Windows or Linux devices. To get started checkout the following link.
Want to keep in the loop about the latest in home automation? Subscribing to SuperHouse Automation on YouTube is the best place to start!
Inspired to start work on this project? Are you working on a project you would like us to feature in this blog? The team at SuperHouse Automation would love to know! Tell us about it in the comments section below or on Facebook and Twitter.
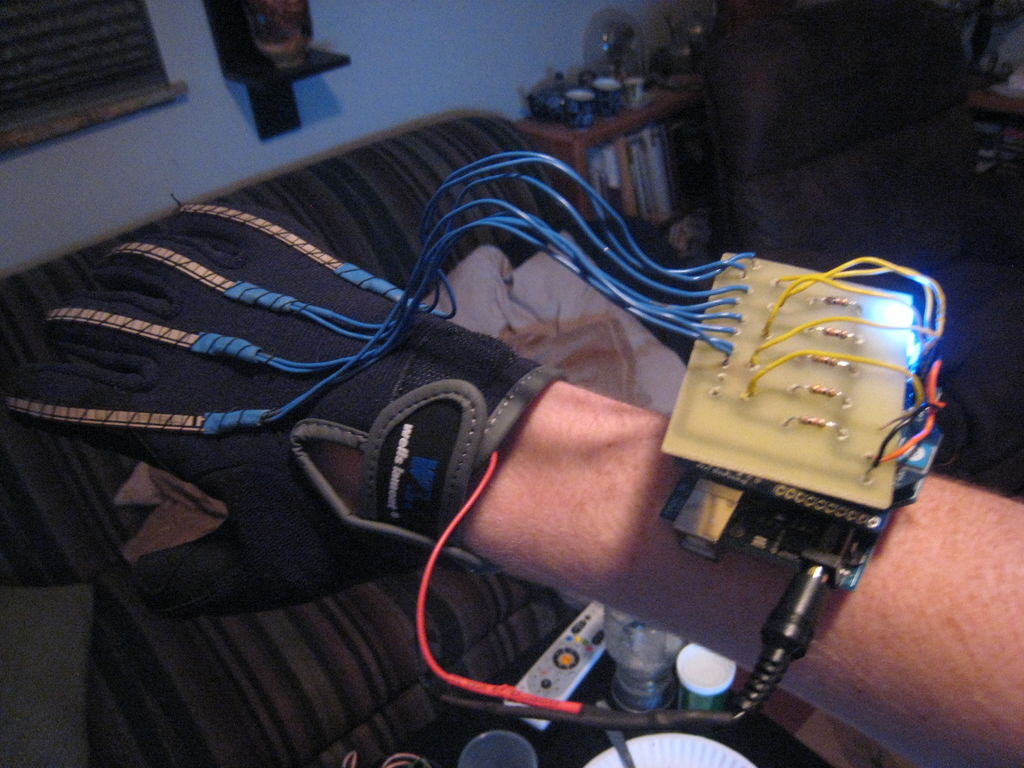
Who has not wanted build a robotic hand at some point in their life? Well this is exactly what instructables member njkl44 has done! Not only does this animatronics hand look totally awesome, it actually emulates the movements of the hand that is inside the “control glove”, making a spectacular effect.
The control glove uses a number of flex sensors to determine the position of each finger and sends this information to the animatronic hand. If this sounds like the kind of project you would love to make you can find out more at the following link or in the video below.
Want to keep in the loop about the latest in home automation? Subscribing to SuperHouse Automation on YouTube is the best place to start!
Inspired to start work on this project? Are you working on a project you would like us to feature in this blog? The team at SuperHouse Automation would love to know! Tell us about it in the comments section below or on Facebook and Twitter.
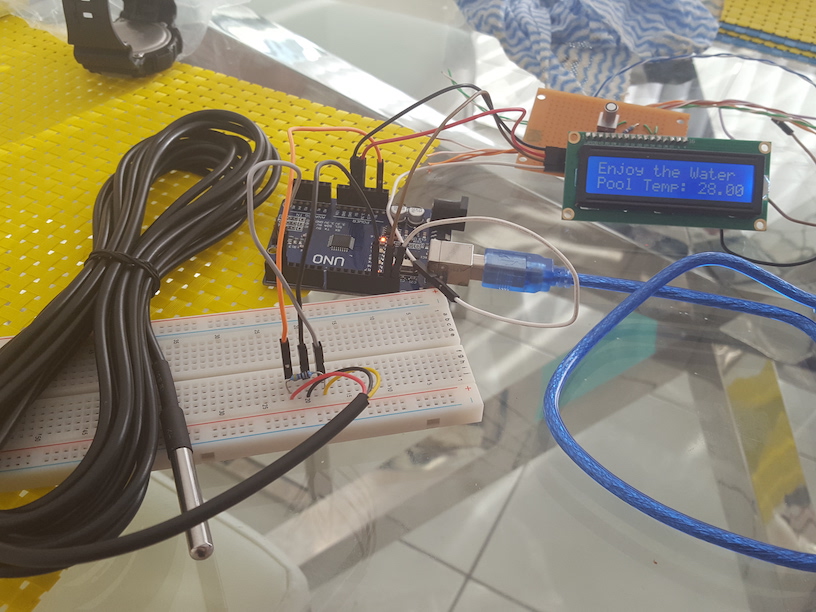
At SuperHouse we love to see the projects other makers are working on. This week we would like to give a big shout out to Keiran who seems to be making great progress learning Arduino. Keiran has built his own pool temperature monitor! You can read more about the temperature monitor, and share your own creations over on the Freetronics forum.
Want to keep in the loop about the latest in home automation? Subscribing to SuperHouse Automation on YouTube is the best place to start!
Inspired to start work on this project? Are you working on a project you would like us to feature in this blog? The team at SuperHouse Automation would love to know! Tell us about it in the comments section below or on Facebook and Twitter.
The Freetronics dot matrix displays are very versatile. Toby Robb has put together a great video showing how he has set up the display to read messages from MQTT. If your home automation system incorporates MQTT this could be a great way to display information about your home.
If you are looking for an LED dot matrix display why not check out the Freetronics range of displays. They are simple to use, yet very bright for indoor and outdoor situations. Available in various colours, the 32 x 16 LED matrix can display text and graphics easily, and can be daisy-chained together for extended displays. For more information, checkout the Freetronics Dot Matrix Displays here.
Want to keep in the loop about the latest in home automation? Subscribing to SuperHouse Automation on YouTube is the best place to start!
Inspired to start work on this project? Are you working on a project you would like us to feature in this blog? The team at SuperHouse Automation would love to know! Tell us about it in the comments section below or on Facebook and Twitter.
The flash memory chip in Sonoffs is 8Mbit, which is only 1MByte. Then if you want to do OTA (Over The Air) updates you need to limit your program size to less than half the available memory so that a new program can be uploaded alongside the old one. And if you use a SPIFFS (SPI Flash File System) to store non-volatile data outside your program, you lose even more memory.
You can replace the flash memory chip with a Winbond 25Q32FV in SOP-8 package, which is a 32Mbit (4MByte) chip. You can buy them on eBay for about US$3 for a pack of 10.
The original flash memory on the Sonoff is a Winbond 25Q08FV, which is the 8MBit (1MByte) version of the same chip.
Thanks to Pete Scargill for this idea! You can see more on his original blog post: “32Mb ESP01 and Sonoff”
Safety
Sure, you can just cut a power lead and screw it into a Sonoff, but it’s probably a bad idea. You need to consider how your Sonoff will be used, including physical protection (stop little fingers reaching the terminals!) and liquid protection from spills. You also need to make sure there is strain relief on the cables to prevent them being pulled out, and possibly exposing live mains connections. You can do it cheaply using a plastic project box, and with some cable ties around the cables just inside the box so they can’t be pulled out. The result can be a very neat setup that won’t look like a dodgy DIY cable, and should be safe for general use.
You can go even further and use an IP-rated (Ingress Protection) case and cable glands, to make your Sonoff waterproof and physically very strong.
In this video I gave a very simple explanation of the two-digit IP codes. There are also extensions to the code for other attributes. You can find more information and tables showing the specific meaning of the numbers at en.wikipedia.org/wiki/IP_Code.
Switches
Internet control is fun, but usually you also want some way to manually turn the output on or off without using your phone. You can modify a Sonoff to connect an external button across the pins of the built-in button, allowing you to toggle the output by pressing the button manually. The built-in button is connected to GPIO0, so when the button is pressed it pulls GPIO0 to GND. This is used during power-up to put the Sonoff into bootloader mode, and can also be used to toggle the output or do other actions.
Alternatively, you can connect an external button between GND and GPIO14 so that your software running on the Sonoff can detect when it has been pressed. Some firmware, including Theo Arends’s TASMOTA, supports this out of the box.
GPIO14 is exposed on the internal header used to upgrade the software on a standard Sonoff. There is already a pull-up resistor on GPIO14, so you don’t need any other parts. Just connect a button across the GPIO14 and GND pins, and you’re done!
Even better, TASMOTA has an option to support an external switch instead of an external button. The difference is that with a button, you want the output to change state each time you press and release the button. This means the firmware needs to treat both the button press and release (cycling from HIGH to LOW to HIGH) as a single event. But a switch just changes state (goes from HIGH to LOW, or goes from LOW to HIGH) and stays there because it latches in place. So your software needs to treat each level change as a separate event, and toggle the output. Once again, TASMOTA supports this out of the box.
Sensors
As explained in the section about switches, the regular Sonoff exposes GPIO14 on the internal header that is used for flashing new firmware. The same header also provides GND and 3.3V connections, and the GPIO14 pin is provided with a pull-up resistor. This makes it super easy to connect anything that needs a single digital pin, such as an external switch / button or a one-wire sensor.
To make it even easier, the Sonoff TH10A and TH16A both feature a 2.5mm 4-way (TRRS) socket that is intended for connecting external sensors. The socket provides 3.3V, GND, and GPIO14: the same I/O pin exposed on the internal header of a normal Sonoff. That means you don’t even need to modify the board, you can simply plug in your sensor or switch externally.
The 2.5mm socket also has a 4th connection, but there are parts missing inside the Sonoff so it’s left unused. You can fix this easily by putting a solder blob across two pads on the Sonoff PCB, and optionally installing a pull-up resistor.
In the video I said that there is a 10k pull-up from GPIO14 to 3.3V. However, I didn’t notice that there are actually 2 pull-ups in parallel, so the effective pull-up on GPIO14 is 5k! You can still use a 10k pull-up on GPIO4 if you like, or you can use a 4.7k resistor if you want them to be about the same. 4.7k is common for I2C, but 10k is generally fine too.
Software
There are many alternative firmware projects for the Sonoff. Personally I love Theo Arends’s firmware, but there are many others that may suit you better.
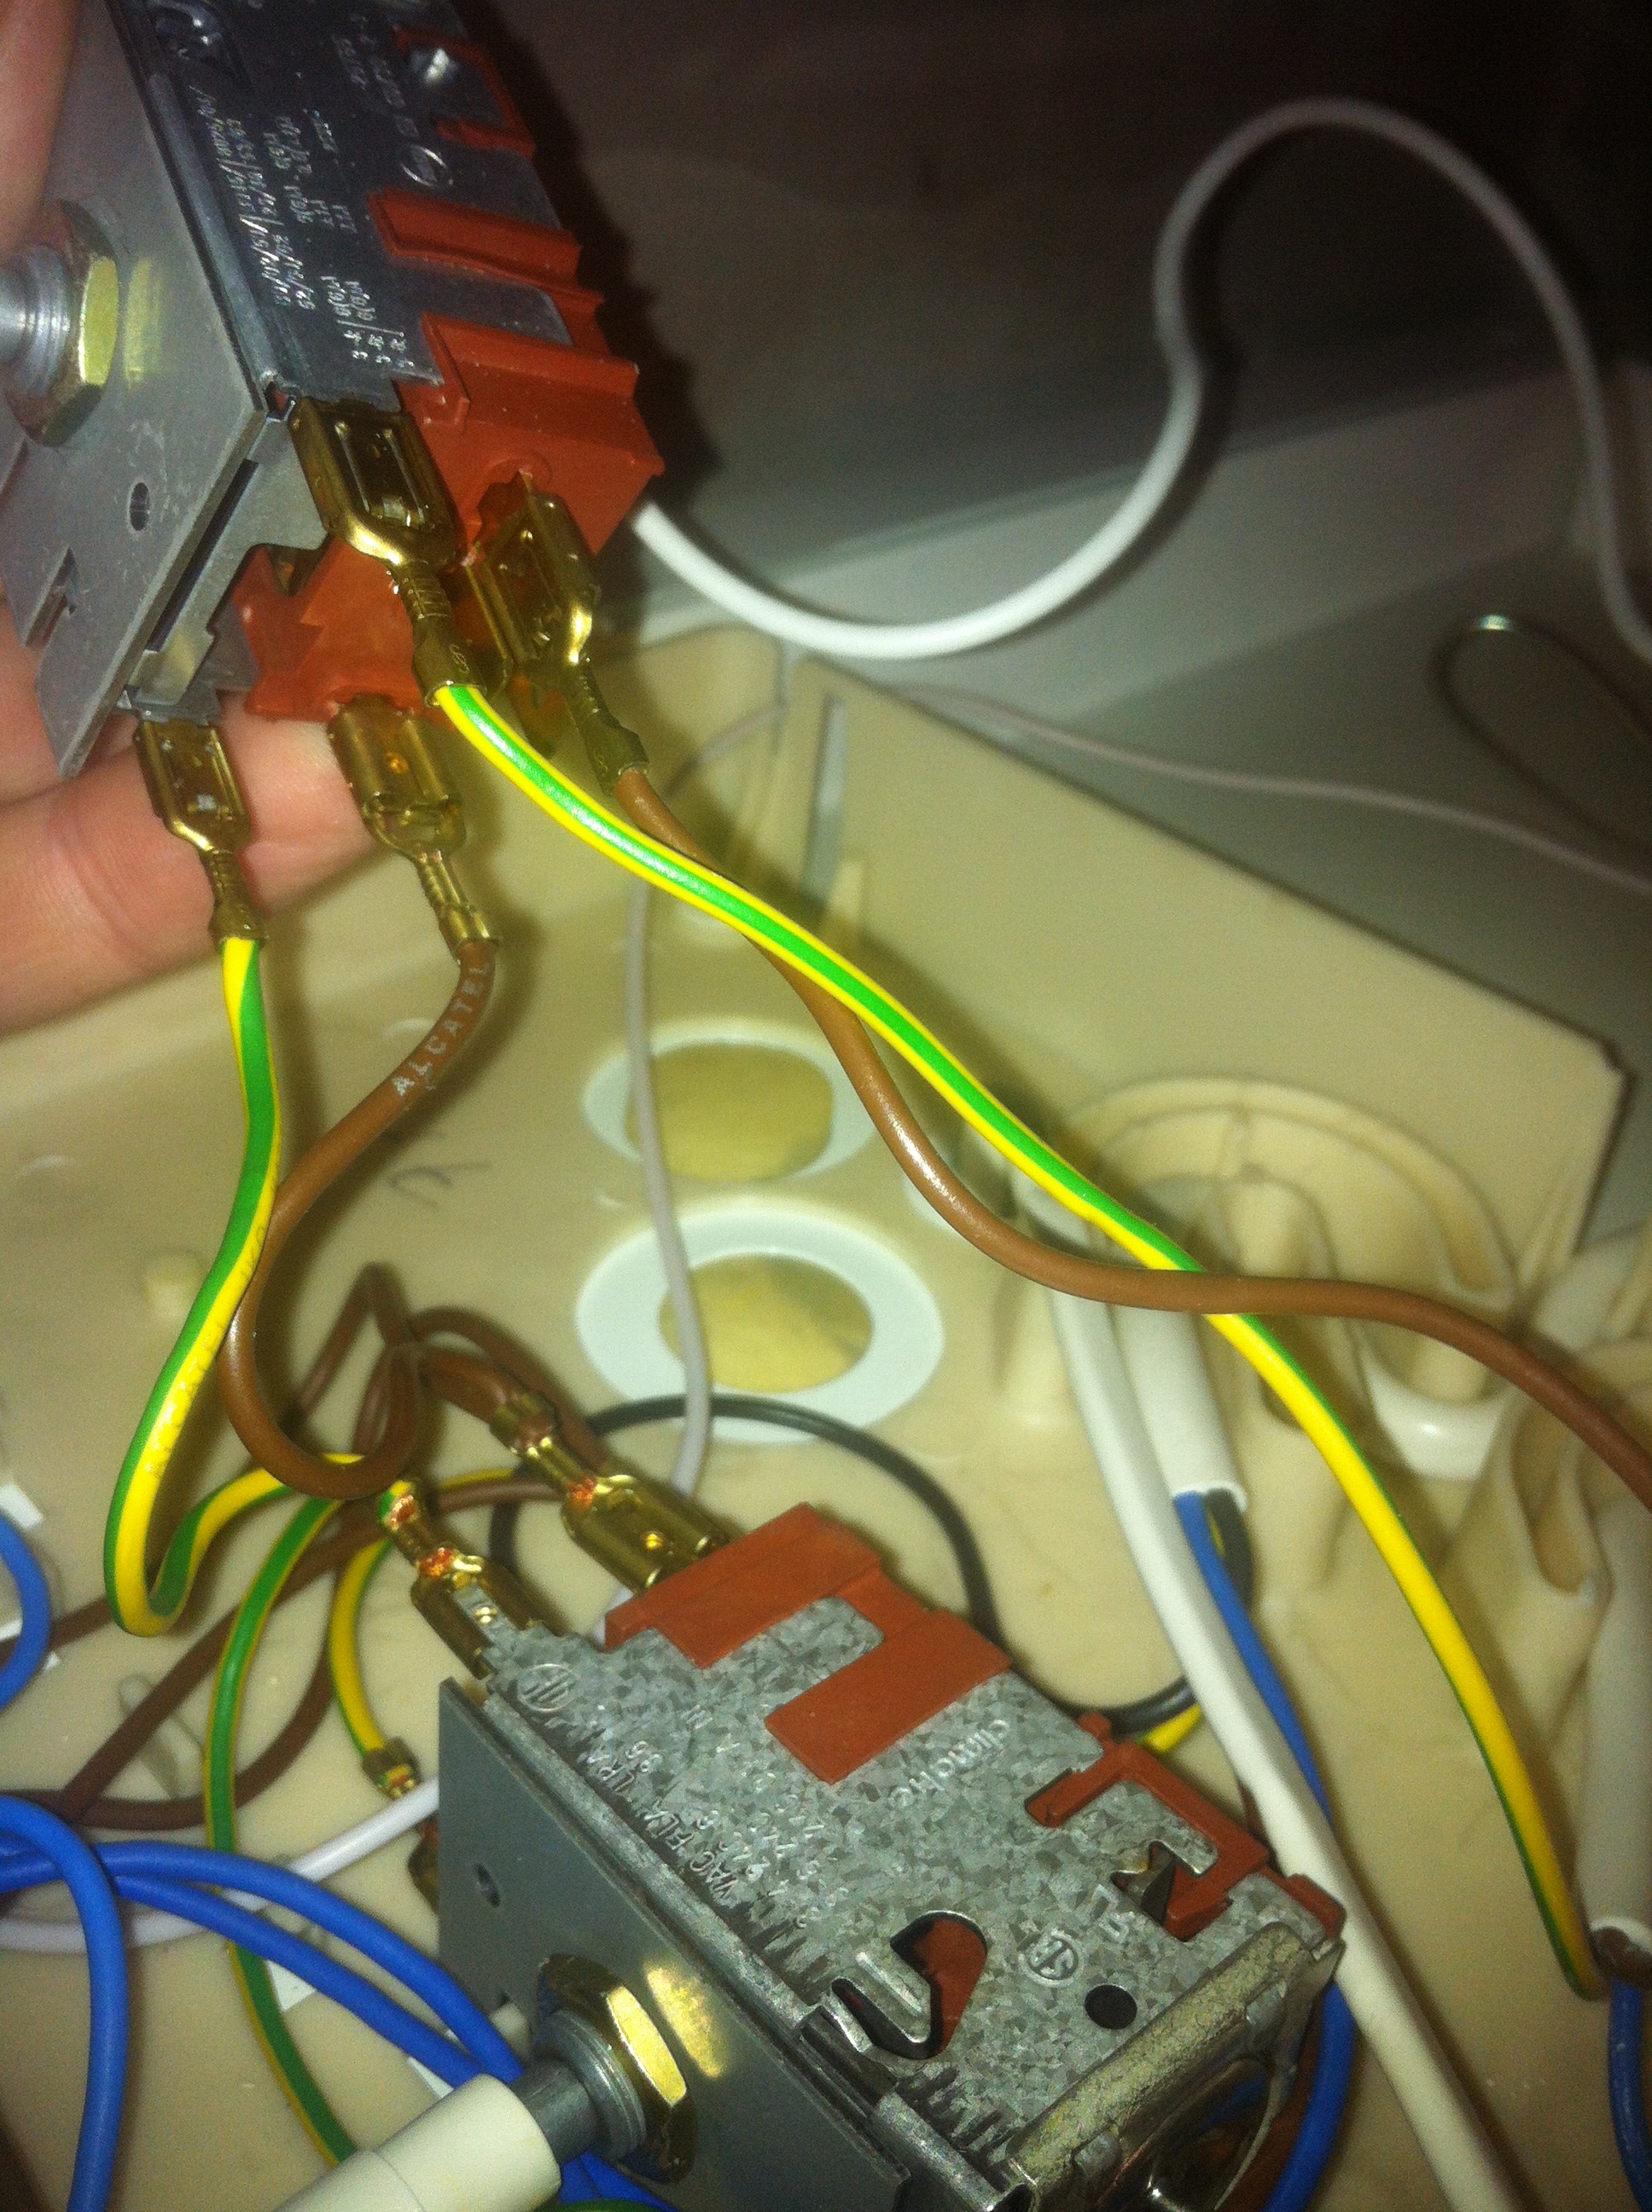
Often the thermostat on a fridge can break rendering the entire fridge useless without costly repair. Fortunately, like most problems, this can be solved using Arduino! Asynkronix has put together a great guide on how you can use an Arduino to cheaply replace a broken thermostat in your fridge. The fix works by reading the temperature inside the fridge and using the Arduino to switch on and off the cooling compressor as needed using a relay. To find out more about how you can fix your own fridge checkout the following link.
Want to keep in the loop about the latest in home automation? Subscribing to SuperHouse Automation on YouTube is the best place to start!
Inspired to start work on this project? Are you working on a project you would like us to feature in this blog? The team at SuperHouse Automation would love to know! Tell us about it in the comments section below or on Facebook and Twitter.


 The flash memory chip in Sonoffs is 8Mbit, which is only 1MByte. Then if you want to do OTA (Over The Air) updates you need to limit your program size to less than half the available memory so that a new program can be uploaded alongside the old one. And if you use a SPIFFS (SPI Flash File System) to store non-volatile data outside your program, you lose even more memory.