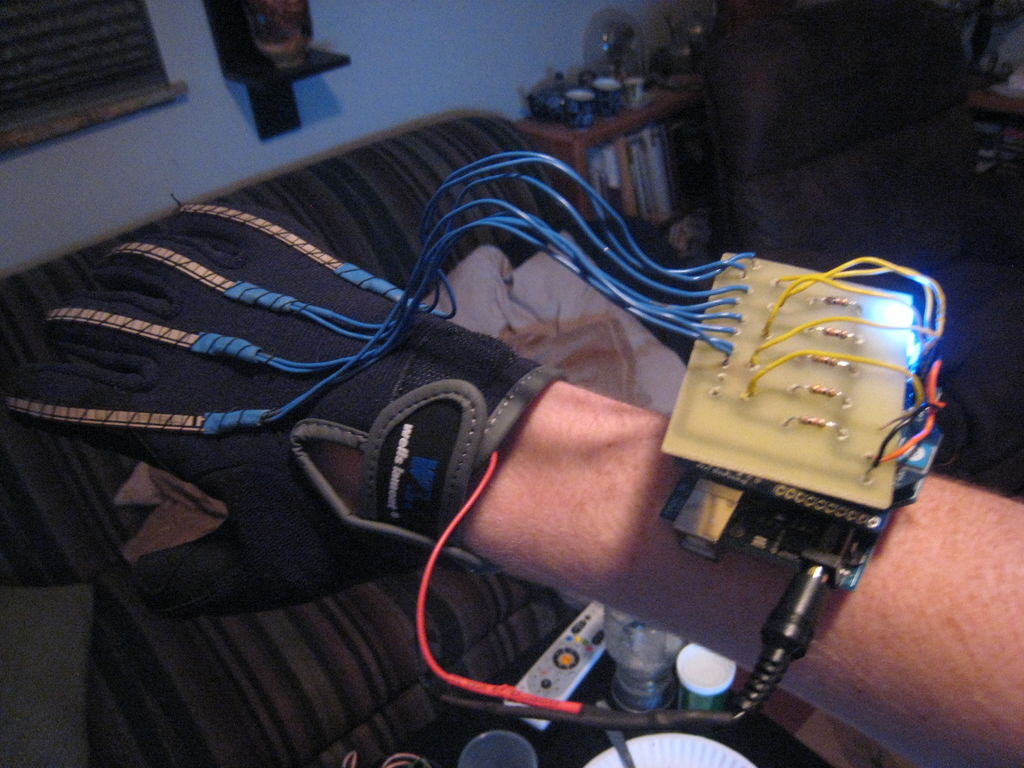
Posted on Leave a comment

Dot Matrix Display MQTT Message Client

The Freetronics dot matrix displays are very versatile. Toby Robb has put together a great video showing how he has set up the display to read messages from MQTT. If your home automation system incorporates MQTT this could be a great way to display information about your home.

If you are looking for an LED dot matrix display why not check out the Freetronics range of displays. They are simple to use, yet very bright for indoor and outdoor situations. Available in various colours, the 32 x 16 LED matrix can display text and graphics easily, and can be daisy-chained together for extended displays. For more information, checkout the Freetronics Dot Matrix Displays here.

Want to keep in the loop about the latest in home automation? Subscribing to SuperHouse Automation on YouTube is the best place to start!

Inspired to start work on this project? Are you working on a project you would like us to feature in this blog? The team at SuperHouse Automation would love to know! Tell us about it in the comments section below or on Facebook and Twitter.

Posted on Leave a comment

Arduino Fridge Thermostat

Often the thermostat on a fridge can break rendering the entire fridge useless without costly repair. Fortunately, like most problems, this can be solved using Arduino! Asynkronix has put together a great guide on how you can use an Arduino to cheaply replace a broken thermostat in your fridge. The fix works by reading the temperature inside the fridge and using the Arduino to switch on and off the cooling compressor as needed using a relay. To find out more about how you can fix your own fridge checkout the following link.

Arduino Fridge

Want to keep in the loop about the latest in home automation? Subscribing to SuperHouse Automation on YouTube is the best place to start!

Inspired to start work on this project? Are you working on a project you would like us to feature in this blog? The team at SuperHouse Automation would love to know! Tell us about it in the comments section below or on Facebook and Twitter.

cropped-SuperHouse-LogoOnly-512x512.jpg

Posted on 1 Comment

Arduino NYE Countdown Timer!

Any New Year’s party is incomplete without some sort of countdown to welcome in the new year! Although you could easily use an app on your phone, nothing beats the satisfaction of making your own! This is exactly what The Soldering Station has done using a seven segment display and an Arduino Uno.

Parts

The instructions are very thorough so you should have no trouble getting your countdown timer ready in time for the 31st of December! To get started checkout the following link.  You can see the kit in action in the video below.

Want to keep in the loop about the latest in home automation? Subscribing to SuperHouse Automation on YouTube is the best place to start!

Inspired to start work on this project? Are you working on a project you would like us to feature in this blog? The team at SuperHouse Automation would love to know! Tell us about it in the comments section below or on Facebook and Twitter.


Posted on Leave a comment

DIY TV Lift Cabinet

For many families the TV is an important part of the living area, however it can be very desirable to keep your TV hidden away when it is not in use. Not only does this keep your TV protected but it also prevents kids watching TV when they aren’t meant to! A great solution to this problem is to have a TV lift cabinet which keeps your TV hidden but at the push of a button you lifts your TV out of the cabinet so it can be used. To find out more about how you can build your own TV Lift Cabinet checkout the following link.    

Want to keep in the loop about the latest in home automation? Subscribing to SuperHouse Automation on YouTube is the best place to start!

Inspired to start work on this project? Are you working on a project you would like us to feature in this blog? The team at SuperHouse Automation would love to know! Tell us about it in the comments section below or on Facebook and Twitter.

Posted on Leave a comment

Robotic Drum Kit

Unlike flawed human drummers, this Arduino powered robotic drum kit never slows down or speeds up! Randofo from instructables has modified his entire drum kit so that it can be controlled over USB on his computer.

Drum Kit

The drum kit has a one set of motor controlled drumsticks for each drum or cymbal. Each of these sets of drumsticks is controlled using an Arduino Uno and a motor shield. This is a very impressive project, but also a project that is certainly able to be completed by someone willing to put int the time and effort. The results definitely are fantastic! To find out more check out the following link.

When you use motors in your Arduino project you will almost certainly need a H-Bridge motor driver. A H-Bridge allows you to easily control the direction of your motors from within your code. The Freetronics Dual Channel H-Bridge Motor Driver Shield is a perfect solution to this problem, allowing you to drive two DC motors or a stepper motor. The Dual Channel H-Bridge Motor Driver Shield features PWM control, selectable current limits and a prototyping area to add your own parts. To find out more check out the Dual Channel H-Bridge Motor Driver Shield page.

Want to keep in the loop about the latest in home automation? Subscribing to SuperHouse Automation on YouTube is the best place to start!

Inspired to start work on this project? Are you working on a project you would like us to feature in this blog? The team at SuperHouse Automation would love to know! Tell us about it in the comments section below or on Facebook and Twitter.

SuperHouse-LogoOnly-512x512

Posted on Leave a comment

MAC Addresses

A fundamental aspect of many home automation projects is the ability to connect an Arduino to the internet to allow easy control of  inputs and outputs from anywhere in the world.  A crucial part of achieving this connection is to set up a MAC address for your Ethernet connected Arduino. A MAC address is a unique identifying number that is needed in the data link layer of a TCP/IP network. To find out more about how to setup MAC addresses checkout the following link.

ethermega-300x214Want to keep in the loop about the latest in home automation? Subscribing to SuperHouse Automation on YouTube is the best place to start!

Inspired to start work on this project? Are you working on a project you would like us to feature in this blog? The team at SuperHouse Automation would love to know! Tell us about it in the comments section below or on Facebook and Twitter.


Posted on Leave a comment

Arduino Christmas Lights Controller

With Christmas fast approaching now is a great time to build a Christmas light controller and add some spectacular effects to your lighting display. Controlling LEDs is something that Arduino is particularly good at which makes it perfect for controlling Christmas lights. There are many potential projects and combination of colours and patterns that are possible. The following link gives some great tips on making your own lighting display.

Christmas Lights

Want to keep in the loop about the latest in home automation? Subscribing to SuperHouse Automation on YouTube is the best place to start!

Inspired to start work on this project? Are you working on a project you would like us to feature in this blog? The team at SuperHouse Automation would love to know! Tell us about it in the comments section below or on Facebook and Twitter.

Posted on Leave a comment

Arduino Arrays

This blog post is about learning how to use arrays with Arduino. Using arrays in your code can make your code faster and much more readable. For example, rather than defining a new variable for each pin used in your Arduino code, having an array allows you to assign these all to one array. To access each pin in the array you simply define which address of the array you would like to access. If you would like a more thorough explanation of how Arduino arrays work to implement them in your code make sure you checkout the following link.

Arrays

If you are thinking about getting started with Arduino, but don’t know where to get started, the Freetronics Experimenter’s Kit is a great way to learn the basics. The kit includes a wide range of parts including a servo, sensors, lights, buttons, a sound module and more. Importantly, a Freetronics Eleven Arduino-compatible board is included to ensure that the kit contains everything you need to get started with Arduino. All these great parts would be useless without some form of instructions which is why we have developed a comprehensive project and instruction booklet to get you started. Check out the product page to find out more.

Want to keep in the loop about the latest in home automation? Subscribing to SuperHouse Automation on YouTube is the best place to start!

Inspired to start work on this project? Are you working on a project you would like us to feature in this blog? The team at SuperHouse Automation would love to know! Tell us about it in the comments section below or on Facebook and Twitter.

 SuperHouse-LogoOnly-512x512
Posted on Leave a comment

Smart “Homer”

Are you a huge fan of The Simpsons or any other TV show? Thomas Amberg has created a humorous “Homer” puppet which automatically turns on the TV anytime The Simpsons is scheduled to be on.

Smart Homer

The project works using an Ethernet connected Arduino which automatically checks an online TV program and then uses IR LEDs to turn the TV on. You could very easily adapt this project to turn it into a less Simpsons centric smart TV remote. To find out how you can build your own smart Homer checkout the following link.

Smart Homer

Looking for an Ethernet connected Arduino compatible board? Then check out the Freetronics EtherDue:

EtherDue

It’s the Arduino Due-compatible board with Freetronics additions including Ethernet network connectivity, MAC address chip, microSD storage, optional PoE, upgraded power supply and more. For more information on this powerful board, check out the EtherDue product page.

Want to keep in the loop about the latest in home automation? Subscribing to SuperHouse Automation on YouTube is the best place to start!

Inspired to start work on this project? Are you working on a project you would like us to feature in this blog? The team at SuperHouse Automation would love to know! Tell us about it in the comments section below or on Facebook and Twitter.

Posted on Leave a comment

Build Your Own Scoreboard

Wouldn’t it be cool to build your own full sized outdoor scoreboard?  This is exactly what joevpt has done. The scoreboard uses 24 DMD displays which are controlled by 6 Arduino boards. Impressively the scoreboard updates automatically from an iPhone app which is used to keep track of the scores at joevpt’s rugby club. If you want to read more about this project checkout this thread on the Freetronics forum. 

project1_large

board1_large

If you are impressed by this project and want to build your own scoreboard, why not checkout the range of displays offered by Freetronics. They are simple to use, yet very bright for indoor and outdoor situations. Available in various colours, the 32 x 16 LED matrix can display text and graphics easily, and can be daisy-chained together for extended displays. For more information, find out more about the Freetronics Dot Matrix Displays here.

Want to keep in the loop about the latest in home automation? Subscribing to SuperHouse Automation on YouTube is the best place to start!

Inspired to start work on this project? Are you working on a project you would like us to feature in this blog? The team at SuperHouse Automation would love to know! Tell us about it in the comments section below or on Facebook and Twitter.

cropped-SuperHouse-LogoOnly-512x512.jpg