I get the same comment over and over again about my home automation system: “Why didn’t you just put an ESP8266 in it and use WiFi? You’re living in the past! Wires make it so hard!”
Not so fast, my friend. This video explains why in many situations, wires beat wireless.
My home automation light switches have gone through a series of versions, starting with very complicated switches that all had Ethernet built in. Over time I’ve simplified the system so now the light switches themselves are electrically very simple: they’re just illuminated buttons on a breakout board with an RJ45 connector, and absolutely nothing else in them.
The switches connect to a pair of centralised light switch controllers over Cat-5 cable, so that it can detect when the buttons have been pressed and report events to MQTT.
In this episode I show some of the previous versions of my light switches, and then show how I built an Arduino based light switch controller.
There’s also a general introduction to the I/O breakout schema that I use at I/O Breakout. I’ll probably cover this in detail in a future episode because the same breakout shield will be used in other projects.
The light switches themselves are just illuminated buttons on a breakout board, mounted on a standard wall plate. The 4-button panel uses all 4 available data lines. The 3 and 2 button panels simply use fewer data lines. Click on the schematic for a larger version:
I didn’t spend much time in this episode explaining the current version of my light switches because I’m going to cover it in much more detail in the future. This episode is mostly about the controller.
Addendum: Chris Aitken has written a handy library to detect different button press events, such as single-press, double-press, and press-hold. This could be used to extend the functionality of the button controller significantly. Check it out: github.com/caitken-com/MultiFunctionButton
After years of using cheap lino cutting mats from the $2 shop, I’ve finally put proper ESD mat down on my electronics benches.
I wanted to use a nice blue mat, but Dave Jones (@eevblog) had a bad experience with discoloration so I decided to try plain grey instead. Hopefully this won’t end up going a strange green colour like Dave’s.
I got the mat from Oritech in Sydney. Their full range is listed here:
I’ve been lucky enough to have worked with an electrician to totally rewire my house for home automation, so it works in a very different way to a normal house. This episode traces through how power arrives at my house, is distributed to a pair of sub-switchboards, and from there goes out to loads such as lights. It also covers the important pieces of the system including MQTT and OpenHAB.
General information about MQTT is available at the official MQTT site. The site doesn’t get many updates because the protocol standard itself is fairly stable and well established, but it’s a good reference site with links to many MQTT-related projects. See mqtt.org.
There are many MQTT broker implementations available, written in various programming languages and with different features and levels of performance. I use Mosquitto, which has been around for many years and has never let me down. Note that your MQTT clients won’t care what broker you use or what language it’s written in, provided it supports the features they need. Mosquitto is written in Java, but I typically connect to it from Arduino-based devices. See mosquitto.org.
OpenHAB is currently the main rules engine that I use, which also takes care of state management and provides an app for iOS and Android. I’m still running the v1.x release series, but v2 is out now which is a major rewrite. See openhab.org.
For a general purpose rules engine that communicates using MQTT, check out Node-RED. With a drag-and-drop editor based on Node.js, you can create rules right in your browser. I don’t currently use this, but I’ll probably replace my current home-brew rules engine with Node-RED some time in the future. See nodered.org.
Fantastic guide by forum member @aspork42, with extra resources and a cost calculator if you want to build something like this yourself: Light Switches – How Jon does it
I listen to dozens of podcasts, and I usually have one playing while I’m working on electronics projects in my workshop. The speaker in my iPhone is ok, but I wanted to get some kind of external speaker to give it a bit more volume.
BlitzWolf kindly sent me a BW-F4 Bluetooth speaker to use in my workshop. I’m not really into music (I’d rather spend my time listening to something that teaches me new things) so I can’t give an opinion on its sound fidelity, but so far it’s been great for listening to podcasts.
The BW-F4 charges by USB and can run from battery for most of the day.
The last few months have been an emotional roller coaster as my wife and I complete the sale of a business that I began in a spare room at my mother’s house more than 20 years ago. This hasn’t left much time (or emotional capacity!) to produce SuperHouse videos.
This is a big change in my personal circumstances, so hopefully I will be able to make more progress on SuperHouse now.
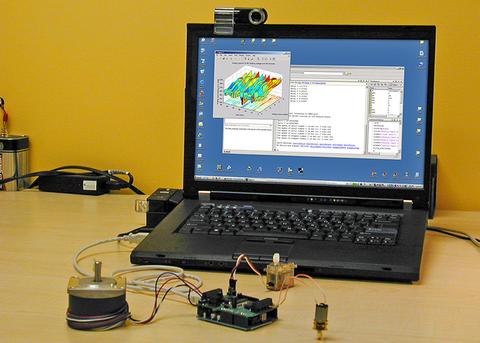
MATLAB is a very popular tool often used by engineers for technical computing, data visualization, simulation and algorithm development. What many people don’t know is that it is possible to connect an Arduino compatible board to MATLAB. This can be achieved through the MATLAB Support Package for Arduino which allows MATLAB to communicate to the Arduino through the USB cable. Not only does this give you to power to blink LEDs from MATLAB, but you can also configure your Arduino to easily collect data and send it into the MATLAB environment where it can be processed using the full power of your PC. Using the MATLAB environment it is also possible to create graphical interfaces to control hardware attached to your Arduino board, and much more! If you want to learn more about how this can be done there are many tutorials available including this one from from All About Circuits or this video series from Mathworks (the creators of MATLAB).
Want to keep in the loop about the latest in home automation? Subscribing to SuperHouse Automation on YouTube is the best place to start!
Inspired to start work on this project? Are you working on a project you would like us to feature in this blog? The team at SuperHouse Automation would love to know! Tell us about it in the comments section below or on Facebook and Twitter.
While working on new SuperHouse episodes I’ve upgraded my surface mount reflow oven. Most things I design are assembled in factories, but about 8 years ago I set up a toaster oven with a temperature sensor so I could do quick reflow at home for prototypes and small production runs.
Some years ago I upgraded the toaster oven by fitting an Arduino based automatic temperature controller, and since then I’ve baked several thousand circuit boards in that little oven. However, the time has finally come to replace it with a proper semi-professional reflow oven.
The T-962A is currently the most common cheap desktop reflow oven, but I need something a bit bigger so that I can run a few dozen boards at a time. I decided to go for its big brother, the T-962C.
Yes, I know the camerawork is terrible! Normally I’d re-film anything that looks as bad as some parts of this vlog, but TBH I can’t be bothered for a quick update 🙂
Grass grows at different rates depending on the time of year, so sometimes it’s necessary to change the Automower schedule to suit the growing conditions. Now it’s winter here in Melbourne and my grass is growing very slowly (and even dying off in patches) so I need to reduce the mowing time.
Husqvarna have made it very easy to change the settings directly on the mower, allowing me to change it from 2 hours of mowing per day to 1 hour.
Have you ever written some code that you thought would make a great library but didn’t know where to get started? This tutorial will be perfect for you!
If you haven’t used libraries before they provide a really simple way to extend the functionality of the Arduino environment. For example there are libraries that make it very easy to connect to Ethernet, control servo motors or even work with LCD displays.
So how do you create your own library? First you will need to create two files, one header file (.h), which lists everything that is inside the library, and the source file (.cpp) which contains the actual code. After this you will need to take your existing sketch and appropriately fill out the header and source files. Fortunately this is quite a simple process and there is a great example available on the Arduino website.
Want to keep in the loop about the latest in home automation? Subscribing to SuperHouse Automation on YouTube is the best place to start!
Inspired to start work on this project? Are you working on a project you would like us to feature in this blog? The team at SuperHouse Automation would love to know! Tell us about it in the comments section below or on Facebook and Twitter.